Using free RawTherapee for inverting DSLR-digitized color negatives
14 Jun 2020A picture is worth a thousand words so let me just show one and say that after you’ve read this article, you’ll know how to get such digital camera scans from your color negative film using just freely available software:
 If you’re impressed, read on!
My perspective
First, a couple of words on my background so you understand my perspective better. I started shooting film in 2006 and was scanning myself since 2010 using Plustek 7600. There was a pause in 2011-2016 but since then I’m back in the film game, actively shooting it and using both labs and scanning at home. As you know, inversion of color negatives can be tricky. Over the years I’ve used the following software for doing it:
- Silverfast
- Vuescan
- Negative Lab Pro
In the process I’ve ditched the Plustek and switched to DSLR scanning using Nikon D750/macro lens/home built scanning rig. I thought I was doing fine until I noticed that, if I was being honest with myself, colors on my conversions looked bad and different software from the list above, while giving different results, provided just different shades of mediocrity (if I may cite Simon & Garfunkel!). It’s not that I was ignorant and didn’t read their manuals/forums/tutorials. When you spent money on it, for sure you try to study them better.
All of this ended when I’ve discovered free (open source actually) raw converter RawTherapee which has negative inversion tool built in. I’ve realized that now I’m able to get the results that actually look better than all of the tools above and I’m doing fine without them.
Introduction
The program offers the following key advantages when working with DSLR-scanned color negatives:
- The negative tool in RawTherapee is not a plugin, it’s a fully native built-in tool so it’s not working within the limits of the host software’s plugin API, like Lightroom based solutions do. It means that after you’ve applied the negative inversion to your RAW, all the other controls of RawTherapee work like they should as if the picture was originally positive, i.e. not in inverted way. E.g. when you work with white balance, you work with native positive values, not with white balance of orange negative mask, the same goes with curves & other adjustments.
- The negative tool uses interesting approach for its work. It’s based not on blindly analyzing/guessing what the inverted image should look like without any input from your side - it uses math to deduce the correct color correction coefficients based on two sample points you specify that you want to treat as being neutral gray. Sure, I know Silverfast HDR has something similar when you can pick up to 4 neutral points and Vuescan has its right click for selecting middle gray, but in my practice RawTherapee still works better.
- All the edits you do are non-destructive, the image inside stays just the same non-inverted raw. All the processing settings are stored in the sidecar human readable (and editable) text files. There’s no any catalog involved, just the raw’s and the sidecars.
- It has great support for general photo editing, giving you stuff like two curves working together or very powerful Lab-color correction (working in the positive (inverted) color space as described in the first point). As all of them work with the original RAW file, there’s no need to export to TIFF if you don’t really need it. If you haven’t noticed, each TIFF file weighs ~3x times more than the original raw file due to being demosaiced.
- Unlike Photoshop & the like, it’s a dedicated raw converter, not a general image editing program, and this means it’s actually convenient to work with many images at once, i.e. you can dump all of the roll’s files in one folder, convert one image and then copy-paste the settings over to the others and quickly switch to them and do one-by-one individual edits.
Of course, RawTherapee is not a silver bullet, and currently it has the following limitations, so it may be not for you:
- Now it supports inversion just on the raw level, before demosaicing. It means you can invert just DSLR-scanned files; TIFFs/RAW DNGs from Silverfast/Vuescan are not supported. The tool’s author is working on it but it’s unavailable yet
- It doesn’t have spot healing tool at the moment, so if your scans are particularly dusty, you need to do final export to TIFF to finish editing in Photoshop/other software.
- It’s not one button auto magic. Don’t get me wrong, if you follow my workflow below you would get to reasonable speed with time, just don’t expect there would be no labor involved! But I actually find advantage in this - i.e. I prefer a tool that has a learning curve but with which I can get the results I like over another tool that gives average results fast and then you bump into the wall not being able to improve them. For me, film is not about speed. And in any case, it’s way faster than e.g. doing it frame by frame with curves in Photoshop.
That being said, none of the above affects me much so it’s perfectly usable as is. And it being open source means anyone with programming knowledge can help out the community ;)
A bit of theory
Here is a brief description of how negative inversion in RawTherapee works. It’s important to read it to better understand the principles. Fuller description is in the forum thread by the developer of the tool (rom9).
Negative inversion can look deceptively easily. Say, you represent brightness of negative (say, for a red channel) with values 0-255. Then, given a brightness with level v on negative, what should the inverted positive brightness be? A naive approach would say it’s 255 - v. But film doesn’t react in this linear way. Instead, it’s exponential: k*(1/v)^p. And those k’s and p’s are different for color channels R, G and B. If you find them, you can do the inversion based on the real physics of the film. To do this, you should give the program two points for which you know for sure they are neutral gray, then it builds system of equations and finds the k’s and p’s so the points in the inverted color space are really neutral gray. The points should be of brightness different enough (say, neutral black and neutral gray), otherwise film grain, which brings a source of error into the equations, will skew the coefficients, as the two points will be too close numerically and so any small random noise from grain will introduce large errors into the answer.
When the program has found the coefficients, it collapses them into three numbers available as sliders in the GUI for precise tuning:
- Reference exponent - actually it’s exponent for a green channel
- Red ratio - how red channel exponent differs from the reference (green) exponent
- Blue ratio - how the blue channel exponent differs from the reference (green) exponent
This allows to treat the Reference exponent slider as preliminary contrast manipulator, and the remaining two control how all the colors are distributed.
So that’s it - if you are working on a roll, you should find a frame on it having clear neutral gray patches of differing brightnesses, sample them with a picker tool and the program will find the coefficients. You can then copy them to all the other frames on the roll. Frames which are over or underexposed will require a bit of manual nudging of coefficients from this default position, that is often easier than it sounds and you will get experience with time.
In theory, the coefficients from one roll of certain emulsion should be close to coefficients of another roll of the same emulsion. Say, two rolls of Portra 400 bought/shot/developed at the same time will likely have the same coefficients. As you imagine, practice will introduce errors in this simple scheme, but usually it’s always possible to find something neutrally white/black to sample and reuse for all the other frames on a roll.
Another approach you may follow in the future is to capture a color checker chart on the first frames of a film roll which you can later sample (it has a row with gray cells of different brightness). Better also shoot several frames, say +2 overexposed, +0, and -2 underexposed so that you can see how the coefficients change with exposure and apply the corresponding ones to particularly hard frames. Obviously, this approach with color checker doesn’t work for already shot films, but it’s not really required. I’ve processed a lot of 35mm rolls already and always found something to sample.
Also important is to not confuse these coefficients with white balance, they are absolutely different things. The coefficients provide more or less invariant constraints for the whole roll, while white balance is set up differently for each frame because it shows how the colors were distributed in that particular scene with that particular lighting. So you first find the coefficients, and only then start searching for the good white balance and exposure curves.
The last bit is color of the film base. To get good result with no color casts, you have to take yet another sample once for a roll, that of the film base (i.e. unexposed space between two frames). The program will then subtract it after the inversion so the blacks stay truly black and not, say, dark green.
Workflow overview
Now that you understand the theory behind it, let’s come to practice. I’ve converted about 25 35mm rolls with RawTherapee already and have converged on the method I describe below. Maybe with time I will rethink some of the steps. Maybe you will find some better ways and post in the comments!
So, the procedure of converting a roll consists of:
- Capturing the frames with a DSLR. You will have to take two additional helper frames in addition to all the normal frames on a roll. One of them is flat field, it will be described in the next section. Another one is frame containing large enough sample of film base.
- Finding a frame on the roll from which you can sample neutral gray/white tones.
- Converting this frame perfectly
- Copy-pasting the settings from this frame to all the other frames for getting ‘base’ conversion and then making individual fine-tuning for every frame.
About flat field correction
One of the special frames you will have to capture as you go digitizing your roll is a flat field frame. It’s important to understand what it is.
The setup of most amateur rigs for DSLR-digitizing is not perfect and there are several sources of problems. First, there is uneven lighting. The corners of the film frame may receive a bit less or a bit more light due to set up of your light source behind the film or the way it’s centered. Or, say, your rig stays close to window and gets some side-light. Or, if you digitize in the evening, your room lamp light gets in from some wall reflection. Second, your DSLR lens has vignetting too and when you capture negatives and then invert them, the darkening of borders due to vignetting transforms to brightening of corners which looks bad.
Of course, there are lots of recommendations on how to insulate from all this sidelight. But you can do only so much here. Also the steps you can take may actually turn your rig very inconvenient to use. In my practice, much better approach is to not be paranoid about insulation, do some simple stuff which doesn’t make digitizing inconvenient. That would get you 80% to the aim. And then solve the remaining 20% with flat field which is a nice and automated way.
Flat field correction is a technique which uses specially shot flat field frames to cancel out effects of sidelight/lens vignetting. How to get a flat field image? Imagine you’ve prepared your film for shooting, i.e. it’s in some holder, the lighting is on behind it, the DSLR lens is focused on the film and everything is ready for capture. Now just remove the film and make the shot using autoexposure on DSLR. That’s your flat field! I.e. it’s a gray looking image which may look gray all the way but actually it captures all the inconsistencies your light setup and/or DSLR lens may have, i.e. if you increase the contrast you’ll see it’s not neutrally gray and the brightness is not evenly distributed across the frame.
Now that you have a flat field frame, you can apply it in image processing program to the photos you later take in the given lighting conditions (i.e. in the same film digitizing session). It kind of ‘subtracts’ the flat field from the image, removing the inconsistencies of your setup. It may sound unclear, but it actually works and later when I’ll show you how to apply it in RawTherapee you will also have possibility to compare with/without to see what effect it gives.
RawTherapee has great support of flat fields, much better than in Lightroom for example. When you apply flat field in Lightroom it cannot do it inside your raw and make it a ‘layer’ which you can enable/disable. No, it can only create another DNG file, which contains the result. Also I’ve seen several times it stumbles on some of the raw’s and inverts them with errors, making the colors really screwed for this and all the following frames. If you’ve already deleted the original raw’s, no luck for you. Unlike Lightroom, RawTherapee makes application of flat field totally non-destructive. It doesn’t create any new file, it’s just a correction on top of your image which you can disable.
Workflow walkthrough
Now I’m going to walk you through the conversion of two frames on one roll of Kodak ProImage 100 film, so you see the procedure. If you have experience with it, you will agree with me that ProImage is quite quirky film, which can be tricky to get good colors from, its negative mask has distinctly different color than other films (it’s more magenta, not red-brown like others) and I guess this fools many programs. All the better for RawTherapee! You’ll see it handles it good.
Let’s split the workflow in two stages:
- DSLR shooting stage, where you take photos of your film frames and transfer them to PC
- Conversion stage, where you take the negative raw’s and turn them to positives
For the conversion stage, I will give you my raw’s so you can just follow along.
DSLR shooting stage
For using the conversion stage workflow below it is assumed you take the following DSLR shooting stage steps.
- Choose software for capturing. I use free qDslrDashboard. It provides full tether, with 1:1 live view/auto transfer to PC.
- Choose a folder on PC for storing images for a roll. It allows storing all stuff related to one particular roll in one place. For rolls I shoot, I use simple numbering scheme, e.g. XXYY-Z where XX is year, YY is month and Z is number of roll taken in this month. Later I use these numbers in file names so I can easily track what was shot when/where/on which film.
- Take flat fields at all apertures you will be using for a roll. See the About flat field correction section above for how to take it. Let’s call this group of frames “Frames FF”. It’s important to take them for each shooting session, don’t reuse flat fields from roll to roll. It allows to always be sure it matches the lighting conditions/tiny differences in set up of your photo rig on that particular day.
- Take a shot between two frames on a roll, so that film base between them goes through the center of a DSLR frame. We need it for sampling film base color so that it can be subtracted to remove wrong color casts. Why leave film base closer to the middle of DSLR frame? To neutralize bad effects of lens/light system on the edges - we want as ‘honest’ film base as we can. Let’s call this frame “Frame FB”.
- Shoot all the frames on the roll. You don’t have to include film base now - you’ve already taken it. Let’s call this group of frames “Frames C”. In my practice, I usually shoot on f11, to get okayish resolution across the frame, but for really good frames I take another approach - I switch to f5.6 and take several photos of one film frame, each time carefully refocusing to different parts of the frame, e.g. one frame is focused in the center of film, another is focused in the corner. Then I process them identically and use focus stacking software to get much better image, which has uniform resolution across the frame. The reality is neither macro lenses have perfectly flat field nor is your film really flat and level. You can either don’t care about it and be fine with ‘good-enough’ or you may take it to the max with focus stack when you need.
Conversion stage
The description below assumes you followed the steps in the DSLR shooting stage described above. Don’t be intimidated by the apparent length of the steps below, I’m just explaining it in all details so you can get to good result on your own frames and don’t miss some important thing. The main idea that I’m going to show is to do correct conversion of just one frame which you then can copy over to all the rest on the roll. After a couple of rolls you will get proficient at it.
- First of all, ensure you have RawTherapee 5.9, not earlier versions, because there were important additions in the film negative plugin, namely film base sampling/subtraction. It’s not that it’s impossible to get good results with 5.8, just 5.9 is so much better. The walkthrough assumes you use 5.9.
- Actually, at the time I’m writing this, there’s no final 5.9 yet, but if you use Windows or Linux you can get nightly builds of release candidate, follow guidelines on the official site (Development builds). Unfortunately, for Mac there are no such automated nightly builds available and I have to use VirtualBox with Linux installed where I built release candidate of RawTherapee from sources, you can do the same. In any case, by the time you are reading this, 5.9 is probably released anyway.
- Open folder where you saved the photos. One of the great things I like about RawTherapee is there is no catalog. You just navigate to the folder where you have your images and start editing. All the edits you do are saved in the sidecar
*.pp3files near the images. So, click the File Browser tab in the left upper corner, navigate to your folder with images and double click it. The thumbnails will appear, find the “Frame FB”, the one that has film base running in the middle, and double click it. It will open in the full view, switching the active tab to Editor. Here you can download my “Frame FB”. - Assign flat field file to it. In order to do this, go to
Raw -> Flat field -> Fileand choose the file from the group “Frames FF” you shot before, that has the same aperture as “Frame FB”. Here you can download my flat field.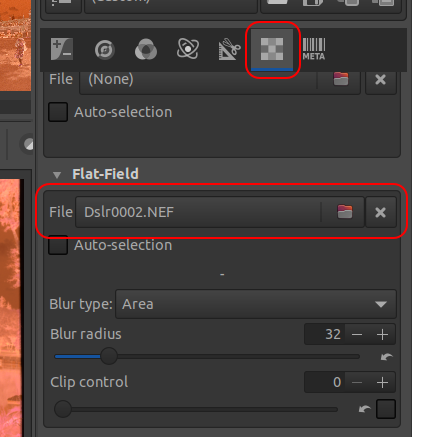
- Our next goal is to sample the film base color. For that, go to
Raw -> Film negativeand clickPick film base color, the mouse cursor will turn to color picker, click on the film base in the middle of the frame (in my sample image it’s in the left corner actually). The negative tool panel updates with values under label “Film base RGB”.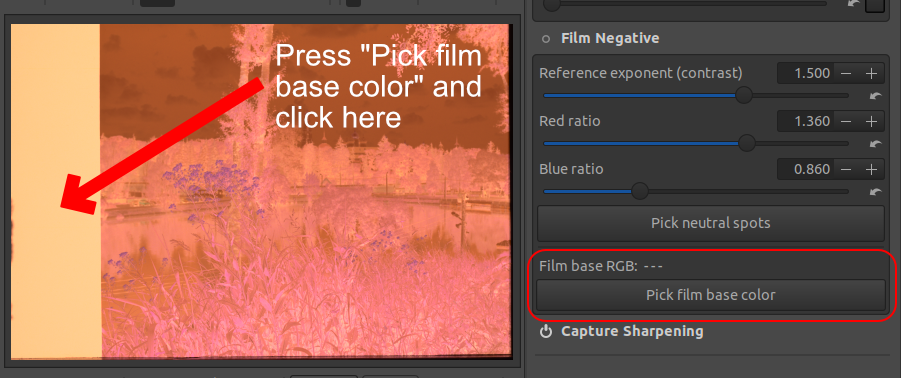
- Enable the film negative mode. For that, go to
Raw -> Film Negativeand click on the circle before theFilm Negativelabel. The picture turns into positive but with very bad colors. Don’t worry about this for now.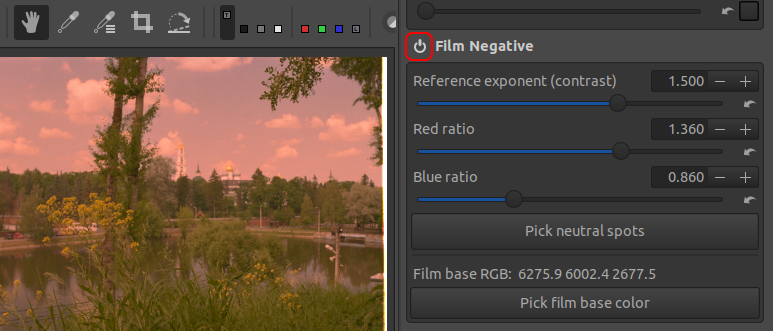
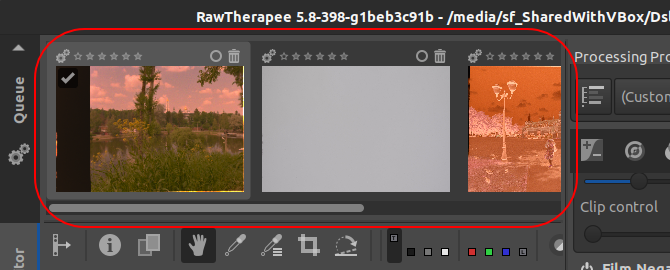
- So you have the baseline conversion, let’s apply it to all the frames from the group “Frames C”. For this, select the current frame you’re editing in the film strip at the top and press Ctrl-C or Cmd-C depending on your computer. Then select all the other frames from the group “Frames C” (i.e. all frames except the flat field and the film base ones) in the film strip and press Ctrl/Cmd-V. The thumbnails will be updated with positive pictures. I’m giving you two raw’s from this roll which we’ll be converting, Dslr0006.NEF and Dslr0012.NEF
- Why have we done this? So you can choose a frame that has significant areas with several distinct shades of neutral gray (say, neutral white and neutral black). We’ll sample them to get good color. This is the most important step actually. You may find in the end you chose a bad frame for sampling and will have to find another. So, let’s suppose you’ve found the frame (for our two frames, I’ve picked the one named
Dslr0006.NEF, because it has nice black-and-white bus which we can sample gray points from). Double click it in the film strip to make it the current one for editing. When it opens, chooseRaw -> Film Negativeand clickPick neutral spots. The cursor will turn to color picker. You have to click the two gray shades one after another. Order does not matter. So, either bright gray first then dark gray or vice versa. Don’t choose two shades that are close to each other in brightness - due to film grain and other factors, the program will have much noisier source signal affecting precision of calculations and so worse final colors.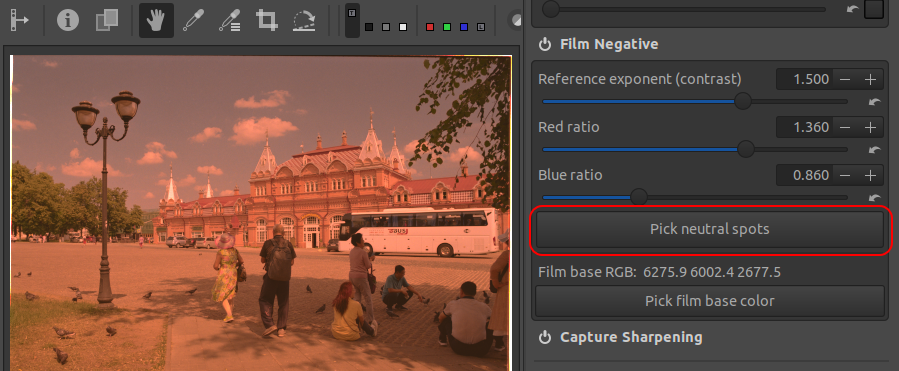
- To increase precision of choosing gray areas, you can double click the image to zoom it, before clicking
Pick neutral spots. Let’s suppose we chose the following gray areas: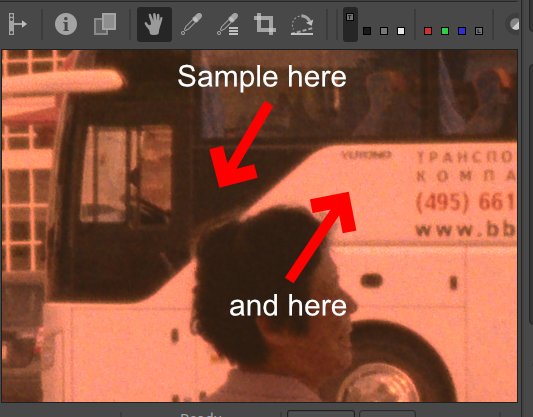
- After you’ve done two clicks, the program will use them to calculate three color coefficients (
Reference exponent,Red ratio,Blue ratio) and update them in the UI. The colors will look more correct but still not entirely - but we are on our way!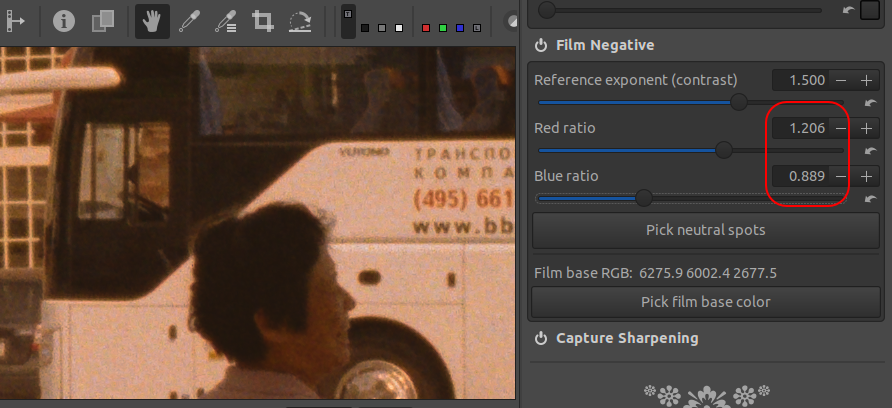
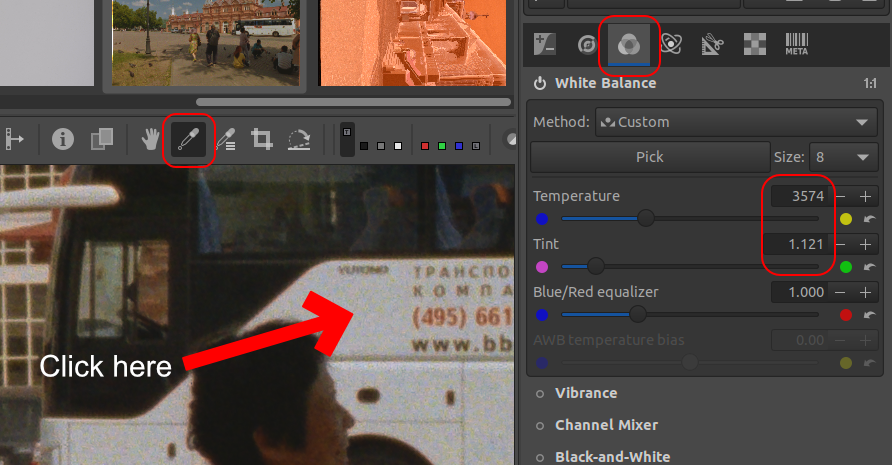
- Select the Spot White Balance tool (shortcut “w”) and click the gray area you used for color sampling. The colors improve, but are still not quite there. You may find you need to correct WB manually. For this picture, I’ve chosen WB to be 3150/1.052:
-
Now we need to edit exposure and it will also remove the remaining color casts. Go to the Exposure tab. There you have two possibilities:
- Use common sliders like Exposure/Contrast/Black etc
- Use the curves
While the former may seem more intuitive at first, resist the temptation and don’t use them! For this particular task of negative inversion, I’ve found the curves give much better precision/control so I recommend using them straight away instead of using the common sliders first only to find out you need to reconvert all your photos to use the curves anyway (I’m talking about myself here!). Unique point of RawTherapee is that it provides not one but two curves! And this comes very handy for our task. We’ll set the first curve to be simple linear scaler, trimming the histogram to the actually used range of brightnesses in your frame.
- So reset the ‘auto-matched’ curve RawTherapee has by default, and choose ‘Standard’ from the dropdown for the Curve 1. You will need just two control points on it.
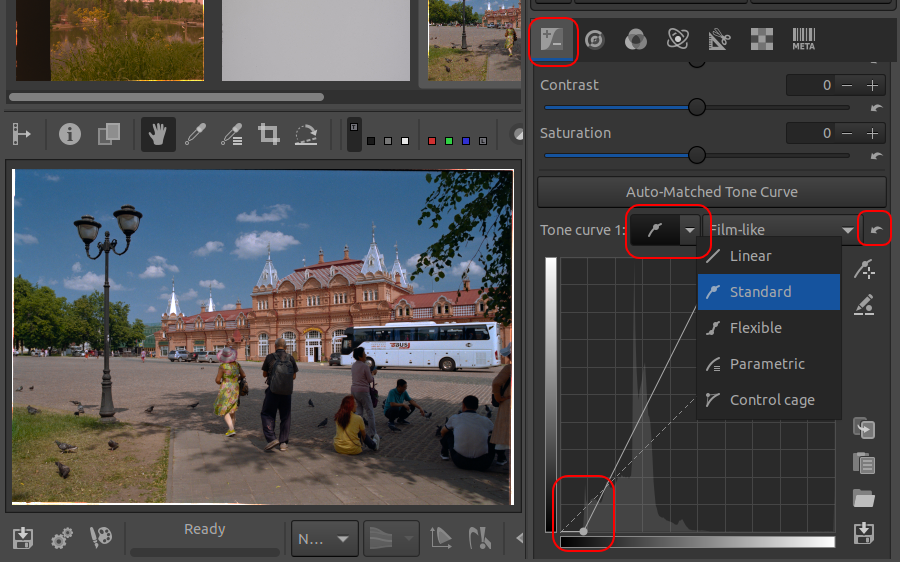
- Then you look at histogram beneath Curve 1 and move control points to limit it - usually I align the left control point with the beginning of the histogram but leave a bit of breathing space near the highlights for the right control point. It’s important to protect the highlights from clipping, as it’s a unique feature of the negative film and you’ll be amazed at how much detail is preserved there compared to the regular digital capture!
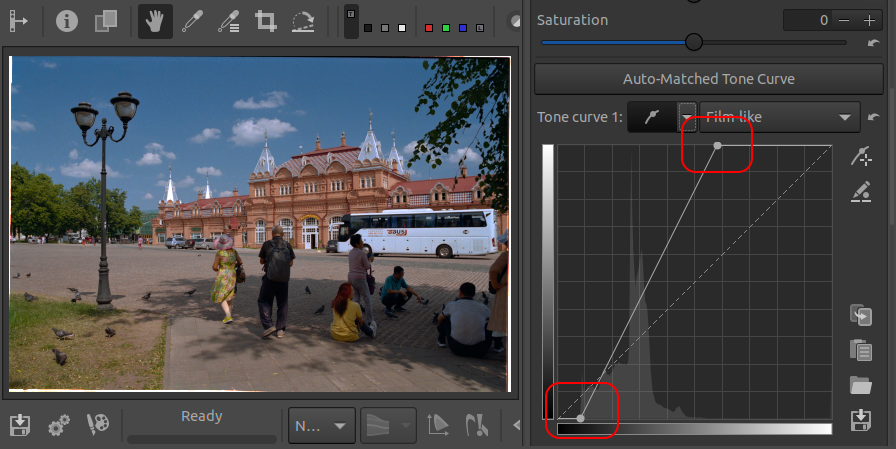
- After you’ve edited the Curve 1 in the way shown above the colors finally look correct! At this stage you may want to edit the white balance again using manual sliders, sometimes small nudge here and there greatly improves the result.
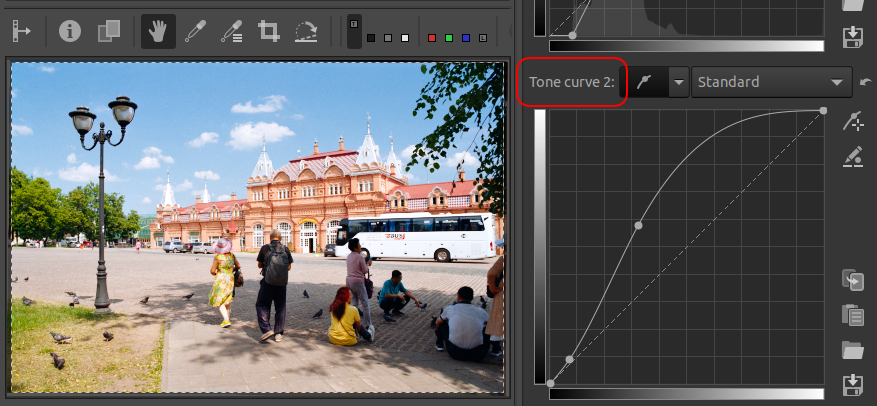
- Now that we have the colors correct, we have Curve 2 at our disposal, which comes into effect after Curve 1, it’s a way to control the tones distribution - here you can edit stuff like contrast/lightness/black/shadow compression. Here it’s entirely dependent on the particular photo and what you want to say with it. The more you practice the better you will be at judging what curve a particular photo needs. The only tips I have here are:
- For consistency, always have your Curve 2 starting in the bottom left corner and ending at the upper right corner. I.e. subtract empty space in the histogram via Curve 1 only.
- Don’t cause it to clip. If you see such clipping, then make the points a bit lower so it goes away. Try to find such position of control points so that the curve is not clipping but the image still looks brighter if that’s your taste. For that, you may have to compensate with Curve 1.
Here’s how I’ve ended up with the curve 2:
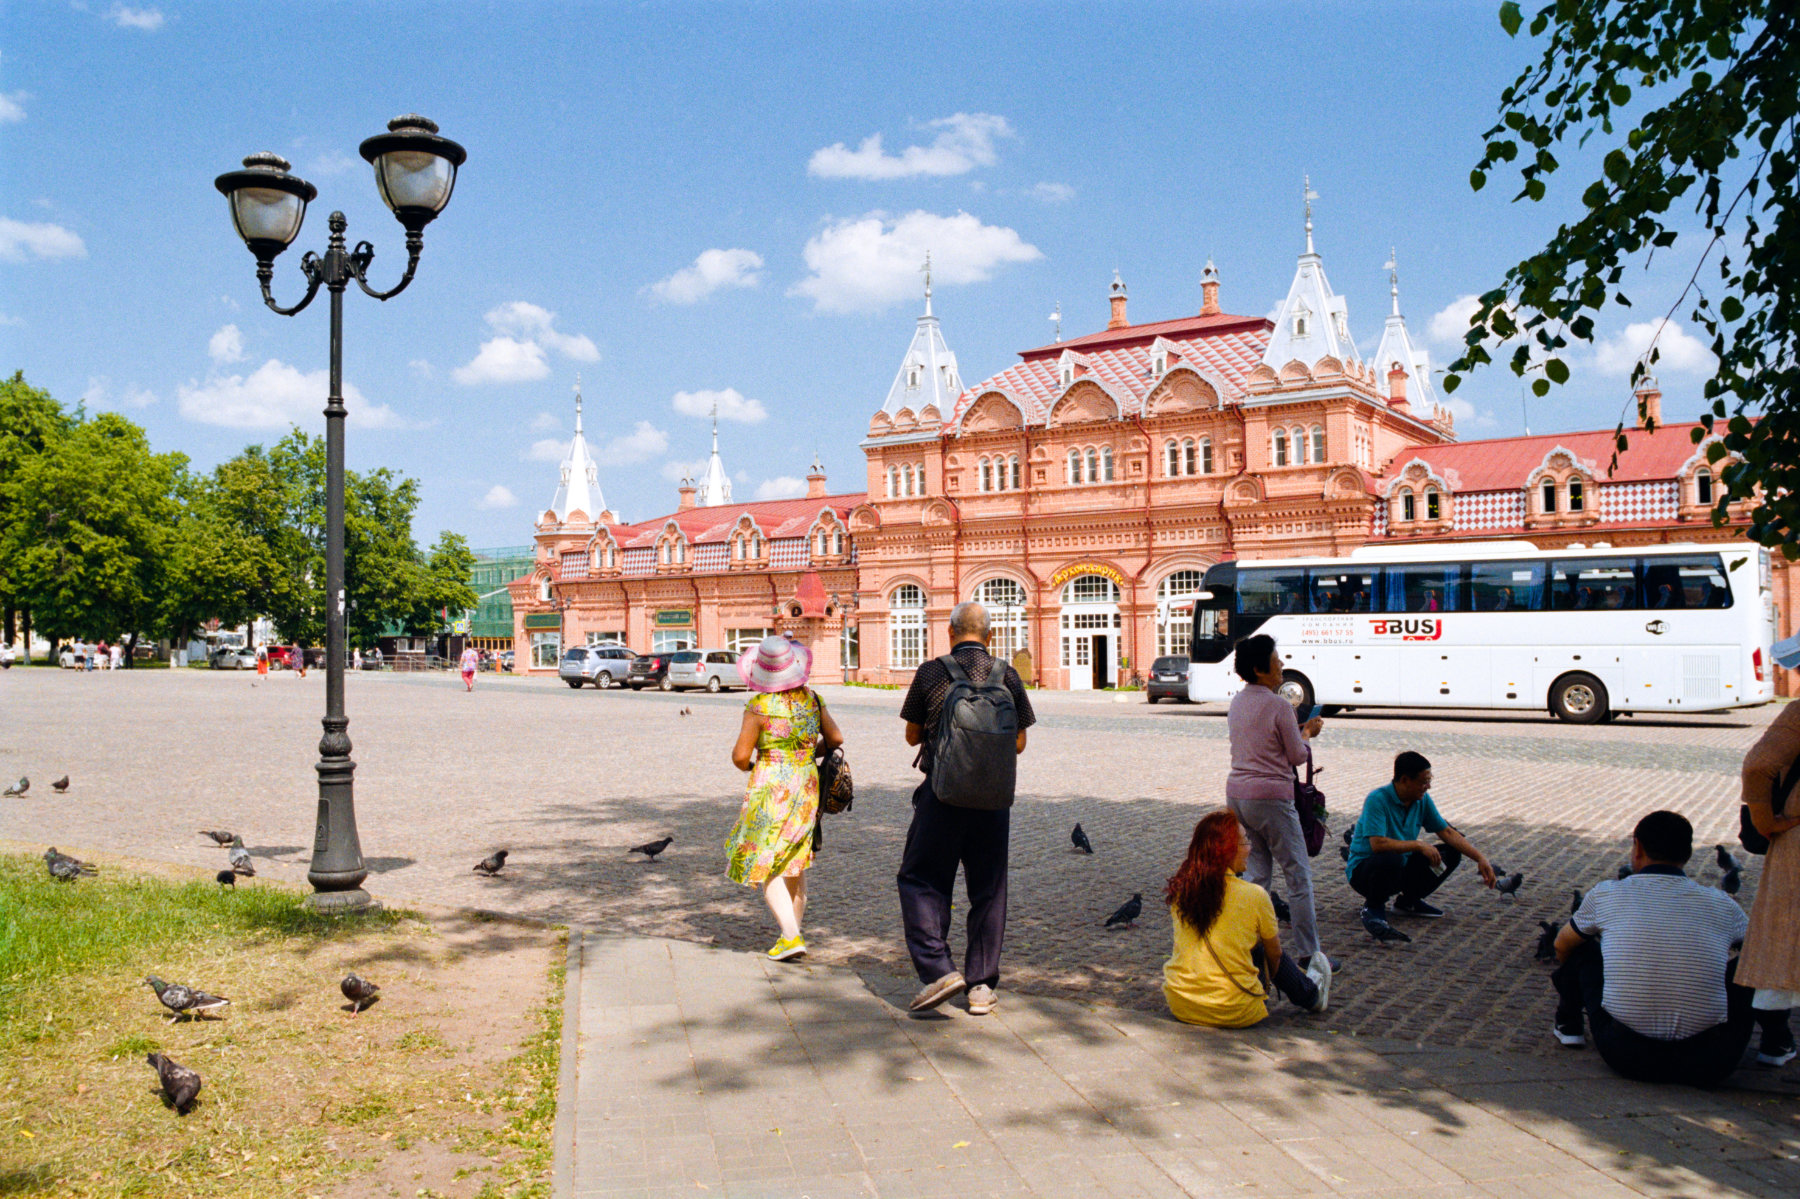
- So after you’ve edited Curve 2 the picture is almost ready. You can crop it to taste and/or do further edits. Here’s my final result:
- Note that unlike approaches taken with some other popular programs, you don’t have to export your file to TIFF now (which is ~3x bigger than the original raw by the way) just to be able to do the further corrections. RawTherapee has lots of great tools, e.g. Lab color editing where you can change colors individually if you dislike something. The good thing is all controls work in direct way, at this stage there’s very little left visible of the fact the original raw was negative, but it still is negative on disk! And the controls all work just on the original raw, not on some copy increasing disk space!
The only real need to export the file to TIFF appears if you want to:
- Use spot healing brush from Photoshop/other programs. Unfortunately, there’s no such tool in RawTherapee now
- Use focus stacking to improve corner resolution
- So, we’ve processed just one frame. Now you’re maybe thinking whether you have to sit through the whole roll doing the same stuff. No! You’ve done the great part already! When you are totally happy with one frame, just select it in the filmstrip, press Ctrl/Cmd-C, then select next frame having just baseline conversion and press Ctrl/Cmd-V on it (copying/pasting the “processing profile” in RawTherapee’s parlance). Then double click on the image you’ve pasted the settings to and apply just minimal edits which are needed because it’s, well, another frame with its own histogram - you need to touch just:
- Curve 1 and Curve 2
- White balance
- For example, here I’ve applied the above copying for the next frame
Dslr0012.NEFand just edited WB a bit:
- Usually you don’t have to change anything else. ‘Usually’ means there may appear some frames, often under or overexposed, that require touching the color coefficients first, over time you will recognise such frames and the direction in which you need to nudge the coefficients to bring colors back to good starting point.


Some tips
Here I list some tips that didn’t find their way into the main text.
- If you find that after sampling gray tones your neutral grays look correct but the highlights are not, e.g. they like to turn rose if they are significantly overexposed, then just try to nudge exponents. For rose/magenta highlights, decreasing the
Blue ratioa bit helps. Magenta shadows is a sign of too smallBlue ratio, nudge it up a bit. - For curve 2, I’ve found the best number of control points is 4, two are in the corners, the other two control contrast etc. It’s amazing what you can do with just two points! Just ensure that no matter you do there are no clippings on the Curve 2 and also on the histogram.
- Don’t do final TIFF export until you are 100% happy. I often return after a couple of days with fresh view and iteratively improve on my previous conversions. Only when you are totally sure can you export to TIFF to do final processing, e.g. doing spot healing brush in Photoshop/Affinity Photo to fix dust.
- If you are technical enough, you can use a version control system like Git to track the changes to the sidecar files (which are just plain text) and commit them as you edit so that you can always return to previous edits in the future and have history log
- If you see that no matter what you do with the curves your highlights look clipped, it may be too high reference exponent set in the negative tool. Just lower it a bit and redo the WB/curve edits, the clippings will go away while the colors stay the same.
- If you can’t get some photo to look correct after pasting color coefficients from another photo, it can be a sign that either of the photos was over/underexposed. Try resampling grays on the photo where you can’t get correct colors.
- One last measure to use to get good colors (but only after you’ve exhausted all the other ways) is to use Lab color space editing in RawTherapee. There you can selectively remap colors, e.g. turn reds to greens etc. RawTherapee provides really advanced tools for this.
Conclusion
If you’re interested, all the photos in this article were shot with Nikon F100/Nikkor AF-S 28/1.8G and were digitized using manual Micro Nikkor AI-S 55/2.8 lens set on Nikon D750, mounted on a macro rail for precise focusing. Film was backlit with Nanguang CN-T96 video light which you can get non-expensively at Aliexpress or eBay.
I hope you will enjoy RawTherapee! Please leave some comments below if my article has helped you. I will try to answer any questions too. Be sure to check my gallery on this site, it contains other conversions from RawTherapee. Maybe one day I’ll also describe my home-built scanning rig in another article.
P.S. Big thanks to Sroyon Mukherjee who liked my initial conversion results & suggested me to write the article. You can read his articles for 35mmc.com here.